pH, Measurement of pH in Soil
Methods of pH Measurement
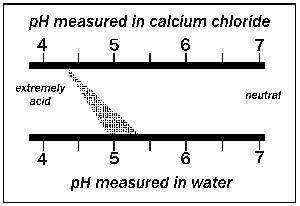
There are many different ways of measuring the pH of soil. Some use a saturated paste extract, others use a 1:5 dilution of soil: water, and then take a pH measurement on the resulting solution with a laboratory meter. Others use the 1:5 dilution, but instead of water they use a dilute Calcium Chloride (CaCl²) solution. As a rough guide, the pH in CaCl² is usually 0.8 pH lower than in water, but can be as much as 2.0 pH units lower on grey sands. Ensure that you check the method used to measure you soil pH so that you are comparing similar methods.
USING A CALCIUM CHLORIDE SOLUTION FOR SOIL TEST
Using a dilute CaCl² solution will probably give more consistent results than using rainwater or diluted water. When the soil is diluted with water , most of the H+ ions tend to remain attracted to the soil particles and are not released into the soil solution. The addition of small amounts of calcium chloride provides Ca2+ ions to replace some of the H+ ions on the soil particles, forcing the hydrogen ions into the solution and making their concentration in the bulk solution closer to that found in the field. The pH measured in CaCl² is almost always lower than pH of the same soil measured in water due to the higher concentration of H+. The procedure gives a value similar to that for natural soil solution because the soil solution also contains dissolved Ca2+ and other ions
Make up a dilute CaCl² solution with distilled/deionised water to use as you need it. Ready made calcium chloride solutions often do not keep for very long, so buy CaCl² and make the solution yourself. The calcium chloride is usually the dehydrate form (water is attached to the crystals - it will have this written on the label of the container - CaCl².2H²O). Dissolve approximately 7.5g of the salt in 5 litres of distilled/deionised water. If you are using a form of calcium chloride crystals without any water attached (CaCl²), dissolve about 5.5g of the salt in 5 litres. There is no need to be very accurate in your weighing as small errors will not effect the results.
Methods for Soil pH
Use the spoon to weigh out about 10g (to the nearest half gram), of your soil into the container. Add 50ml of distilled water to the soil. Any rough measurement ensuring a 1:5 diluted will suffice. Shake the container for about 2-3 minutes then allow the soil to settle for 2 minutes. If your soil has a high clay content and you require a very accurate result, it may not be necessary to filter the suspension. If filtering is note required, measure the pH value on the water above the soil in the container. Ensure you get a steady reading on the digital readout. Always wash your containers out before testing your next sample.
Testing Soil pH Using pH Tester
Measurement of pH in soil is very common as it affects the relative availability of soil nutrients. If the pH is not within an acceptable range, growth will be curtailed and erosion potential is increased. The ability of the soil to provide adequate nutrition to the plant depends on four factors:
- the amount of various essential elements present in the soil
- their forms of combination
- the processes by which these elements become available to plants
- the soil solution and its pH
The amount of various elements present in the soil depends on the nature of the soil and on its organic matter content since it is a source of several nutrient elements. Soil nutrients exist both as complex, insoluble compounds and as simple forms usually soluble in soil water and readily available to plants. The complex forms must be broken down through decomposition to the simpler and more available forms in order to benefit the plant. These available forms are summarized in Table A. The pH value is a measure of acidity or alkalinity. The effect of pH on availability of essential elements is shown below.
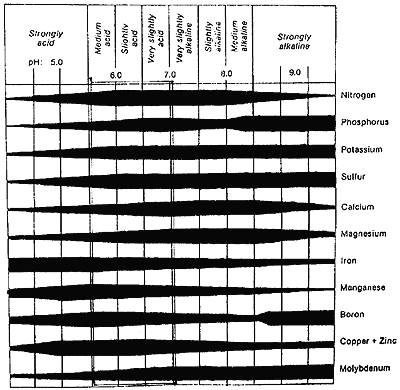
Table A The effect of soil pH on availability of plant nutrients (From Hunger Signs in Crops, edited by H.B. Sprague, 1964, pg. 18)
Iron, manganese and zinc become less available as the pH is raised from 6.5 to 7.5 or 8.0. Molybdenum and phosphorus availability, on the other hand is affected in the opposite way, being greater at the higher pH levels. At very high pH values the bicarbonate ion (HCO3) may be present in sufficient quantities to interfere with the normal uptake of other ions and thus detrimental to optimum growth. When inorganic salts are placed in a dilute solution they dissociate into electrically charged units called ions. These ions are available to the plant from the surface of the soil colloids and from salts in the soil solution. The positively charged ions (cations) such as potassium (K+) and calcium (Ca2+) are mostly absorbed by the soil colloids, whereas the negatively charged ions (anions), such as chloride (Cl-) and sulphate (SO4-) are found in the soil solution.
Soil Sample Preparation
1. Scoop up loose soil samples with a clean, dry plastic jar. Avoid touching the soil with your hands to prevent contaminating the sample.
2. Remove any stones and crush any clumps of soil to prevent breaking the delicate pHScan glass electrode bulb.
3. Fill up your sample soil up to 3/4 and add distilled water to the jar. Cap the jar tight and shake it vigorously a few times. Let the mixed sample stand for 5-10 minutes to dissolve the salts in the soil.
4. Prepare to log your test result in your data book for later reference.
5. Remove the caps of the jar and your pHScan. Dip the pHScan electrode into the wet soil slurry and turn the tester on. Take the reading when it stabilizes.
6. Press HOLD button to freeze the displayed pH measurement. Record the pH reading in your data book.
7. Press HOLD button again to release the reading.
8. Rinse your pHScan tester in clean water between each use.
Calibrate the pHScan tester using the instruction provided in the packaging box.
Soil pH Data from pHScan
The pH test value in this procedure is accurate to ±0.5 pH or better (usually ±0.2 pH). The soil sample preparation and test procedure is adapted from accepted laboratory methods. Soil pH testing in the field gives small differences between tests. Using the 0.1 pH resolution pHScan 1 minimizes these differences.
Most soil pH measurement cannot achieve ±0.1 pH accuracy, even with elaborate laboratory procedures and expensive pH instruments. Usually, soil pH data for many applications do not require testing for better accuracy than a few tenths of a pH or ±0.5 pH in some instances. pHScan 1 easily meets requirements for soil pH testing, and is very economical to use in places where many samples and tests are taken.
Use of Data
Use this soil pH test data when consulting with authorities from your local agricultural extension office, local growers associations, university agronomy/agriculture on soil pH. You must consult these agencies before putting chemicals on soil to correct soil pH, and for finding the cause of soil pH problems. You can consult reference books, papers and pamphlets
Recommendations for Best Results
Prepare and run at least three tests of the same soil sample to confirm results. Minor (< ±0.5 pH) or no differences between readings indicate good technique and high confidence in results. Larger differences (> ±0.5 pH) require more testing and consulting with the authorizes mentioned above. Compare your test results with secondary soil pH references available from these test authorities. Confirm good technique and accuracy of your test results with these agencies.